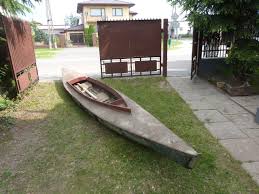
Repair of a rigid kayak

The journey is over, we come back with a hundred impressions, refreshed and satisfied with the beautiful rest, but with severely damaged equipment.
1. The first step before placing it in the hangar (sheds)
it will be a thorough cleaning of the kayak from sand and dirt, then wash it with soapy water and baking soda and place it on a stand until it is completely dry.
2. We proceed to a thorough inspection noting any defects and damages.
3. We start the repair from the inside of the unit, i.e.. floor, seats, rudder, slats, ribs etc.. We repair or replace broken parts (if they are quite large sections) by placing wooden dentures fitted to the damaged areas, gluing them together ("Definitely”, Casein) and squeezing the joined places with forceps until they dry, or we put on metal dentures, connecting them very carefully with copper threads.
4. A damaged cover will take a little longer. If it is a crack or a dent - cut the plywood a patch of the size of the damage with a margin of 3-4 cm and a canvas patch, which is then glued on the inside with a thin putty. Plywood and waterproof glue, additionally fastened with copper rivets. From outside, after cleaning the plating with sandpaper, we putty, taking care of the place being repaired, to seal rivet gaps. After drying, we paint with paint, varnish or enamel in the color of our kayak.
5. Much more work is required to repair a more serious damage, which is the puncture of the plating. We enlarge the pierced hole by aligning it (preferably a square, rectangle), outlining and cutting out the patch, exactly matched to the opening, we coat with waterproof glue and fit it in, then a thin-coated canvas with an area larger than the hole (a reserve of 2-3 cm) stick inside the kayak together with a prepared plywood patch of the same size (grub. 1—2 cm), coated with glue. In turn, we attach with rivets around the fitted patch, then putty and paint in the color of our kayak.
6. If the canvas cover is torn, we sew it with a strong thread (with twine or linen thread), we patch the inside with a linen cloth and stain it.
7. Kayak, so that he does not age too quickly, must undergo certain cosmetics, i.e.. painting. After the season is over, we owe it after washing, drying and repairing the kayak, carefully scrape the paint off it, clean the entire surface with sandpaper and prime with a paint mixture, linseed oil and turpentine. Then we paint with a thin layer (greasy paint) and after the paint has dried, coat it with diluted varnish.
For the winter season, the canoe is placed on a rack in a dry place, airy, at moderate temperature.
8. Oars, although they are made of a better species of wood, and their feathers are glued for strength, they are also damaged and scratched. We try to paint these damages thoroughly, and glue the cracks of feathers after drying. To strengthen a feather that has been broken seriously, after gluing it and making delicate forging, they should be sewn with a thin nylon thread or copper wire (cross stitch), and then varnish.
Also the tin end of the feathers, and the sleeve, we review and repair. The oars renovated in this way are positioned or hanged vertically in order to prevent deformation (caves).
9. Ster, as long as the damage can be repaired, we try to stick together and pull them off with screws or rivets. We check the steering lines carefully, are not worn, what if yes, they must be replaced.
Finally, we must remember to follow the basic rules:
a) we put the canoe directly on the water, after reaching the shore, take it out and fold it upside down;
b) we do not go into the kayak with sand on our feet, and never in shoes;
c) in the shallows or on a rocky bottom, we go out and tow the canoe, to avoid scrubbing with the bottom.
d) after arriving at its destination, the kayak should be cleaned of dirt and sand and the dirt inside, put in a shaded place;
e) we avoid direct sun, moisture inside the kayak;
f) We make ad hoc repairs during breaks in the trip.